What’s in the Box?

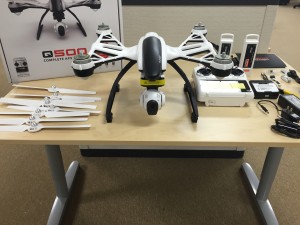
The contents of the Q500’s box is a fantastic representation of the industry standard for consumer drones. Besides the necessary charging cables and extra propellers, the package comes with two 5400mAh 3S 11.1V LiPo batteries, a cover for the controller to reduce glare on the built in monitor, and a micro SD card compatible with the onboard camera. The SD card also has manuals and an introductory video preloaded on it.
The body of the Q500 itself is bigger than most quadcopters on the market and, along with the propellers, the material it is made out of feels a bit flimsy. That being said, I have yet to incur a single crack anywhere on the drone.
The Controller

The Q500’s10-channel 2.4GHz RC transmitter resembles a classic RC controller more so than a Phantom controller. At first glance, I found this a little intimidating but I quickly came to like it even more than the Phantom controller.
The major reason behind this is the built in LED screen.
Unlike a Phantom, which uses a smartphone to control the camera and display the live stream, the Q500’s controller has a built in 4.5″ touch screen for video streaming and telemetry data.
The quality of the 5.8GHz video downlink quality of the image is as good, if not better than the equivalent image the Vision + displays on my iPhone 6.
The other advantage of the built in screen is you don’t have to fiddle with a second piece of hardware to adjust your camera angle. The angle of the camera is controlled by a dial on the right side of the controller, much like the new design on the controller for the Phantom 2 v.3. and there are dedicated buttons on the top of the controller- one for taking a still image and one for recording a video.
On the opposite side of the controller is another dial that controls the max speed of the Q500. So when you are just starting out, you can limit the top speed until you get a feel for the controller.
This is an excellent design feature for first time fliers.
I also really like the big red button which is a simple push to start/stop button. It doesn’t get more straightforward than a big red button.
One feature I am still warming up to is the low battery notification. Most comparable drones flash their on board LEDs (more on this in a moment) in a certain pattern when the battery drops below a certain level. The Q500 does have a *WARNING* LED pattern but the controller itself actually beeps an alarm tone at you while physically vibrating like the ring on a cell phone.
The Camera

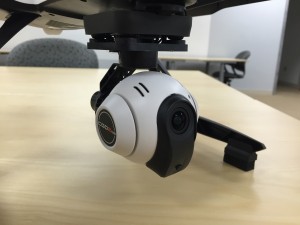
The camera has a 130 degree field of view, takes 12 megapixel photos and records video in full 1080p HD adjustable to 60, 50, or 48 FPS. The live stream has a range of about 600 meters and the on screen image looks even better than the stream from Phantom to iPhone. The one gripe I have with the camera is the connection would go in and out when I put a building between the Q500 and the transmitter.
Like DJI’s Inspire 1, the Q500 camera is modular. In other words it can be easily detached from the drone itself and replaced with new payloads as they come to market, such as Yuneec’s SteadyGrip handheld gimbal.
One more camera feature I really liked was the tiny LED lights on the front that indicated when the camera was on and when it was recording. The lights never affected the picture or video and served to remind me I was still recording.
Oh, and the Q500 camera looks exactly like the one that comes with the Inspire 1.
All of the Lights

During my initial setup, it took about an hour to charge the battery.
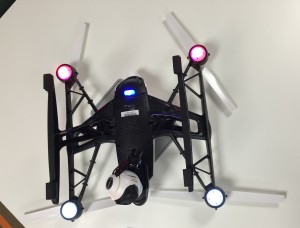
While I was waiting for the battery to charge I read through the manuals and found something alarming. There are indicator LEDs under the four propellers of the Q500 and one under the main body. These five lights can flash six different colors in 23 sequences. There is a card included in the package that translates every pattern, but it still looked like someone had written morse code with an entire box of crayons.
At this point I thought to myself, “I am never going to learn all of this. It’s like a new language!”
Even after several flights, this initial evaluation remains true but I can confidently say the whole things boils down to ‘green = good, red = bad.’
How Does It fly?
My first time out with the Q500, I had a tough time getting the GPS to calibrate properly. The typical ‘toggle switch, rotate vehicle’ process that is common for most similar drones (including the Phantom) just wasn’t working out for me. After a series of restarts, I must have reached the magic number because I turned it on and the indicator lights said I had satellite connection and I was ready to go. Every subsequent time I took the Q500 out, I never had a problem calibrating the GPS.
Once I did finally get the Q500 airborne, everything fell into place. As it turns out, Mr. McNabb was selling his drone short – the Q500 handles very similar to a Phantom. There is no noticeable response delay between the controller and the drone itself holds position and altitude expertly.
The Q500 can be flown in two different modes controlled by a switch in the top right corner of the controller. In Angle Mode, the Q500 will move in the direction the right hand control stick is pushed, relative to the nose of the drone. In Smart Mode, the Q500 will move in the direction of the right hand control stick relative to your physical position.
(An added Smart Mode feature I really liked is, when you have the Q500 in Smart Mode, you can’t fly it within about ten feet of the controller… So you can avoid crashing the drone into yourself while you are learning to fly.)
The switch that controls the flight mode has a third position called Home Mode which automatically returns the Q500 to its point of takeoff and works as advertised.
The battery allows for about 20-25 minutes of flight time depending on how much video you take and what the wind conditions are.
The Q500 can be flown indoors, but enabling indoor flight is not intuitive at all. The speed dial had to be all the way up to the rabbit position and I had to toggle the Mode switch while holding the right hand control stick all the way to the right. This disabled the GPS which allowed me to take off inside, but I would not recommend it. The Q500 drifts a lot with no GPS connectivity (this goes for outside as well) and, when you couple that drift with the size of the aircraft, a crash is inevitable.
Finally, Yuneec’s Q500 is one of the first drones to market with the so-called ‘Follow Me’ feature. The concept of ‘Follow Me’ is that the drone will follow a compatible piece of hardware, whether it’s your smartphone, a bracelet, or as in this case, the drone’s controller.
So how does the Q500’s ‘Follow Me’ feature work?
Just ok.
Setting up ‘Follow Me’ isn’t very intuitive, despite the insert in the box that explains how it works. To enable ‘Follow Me’ the Q500 must be connected to at least seven satellites. You then position the Q500 at the height and angle at which you want it to follow you and then switch it from Angle Mode to Smart Mode.
The Q500 did follow me as I walked up and down my driveway, but its movements weren’t very precise and it would often move very quickly and then keep going once I had stopped. It’s a neat feature in theory and it works as advertised but, it’s difficult to come up with any practical applications for it and I can’t recommend you try it anywhere but in a wide open field.
The Verdict
Yuneec’s Q500 is an excellent drone. Minus the autonomous features of DJI’s Phantom, it is a very comparable piece of hardware. It’s fairly easy to set up, has a very short learning curve, and takes excellent pictures and video. If you are in the market for your first drone, we strongly recommend you check out the Q500.


